# Welcome to Blast Docs
[Blast](https://www.blastblockchain.com/) is a blockchain built on the Optimism rollup, inheriting the powerful OP Stack. As a project dedicated to advancing Ethereum's capabilities, Blast focuses on scaling technology and fostering global collaboration in decentralized economies and governance systems. The Blast Collective, driving this initiative, develops open-source software to address key challenges in the broader cryptocurrency ecosystem. Guided by the principle of **impact=profit**, Blast rewards contributors proportionately, aiming to redefine incentives and positively impact the world. Explore our repository to engage with essential components of the OP Stack, contributing to the collaborative advancement of the Ethereum ecosystem.
## Get Started
We've put together some helpful guides for you to get setup with our product quickly and easily.
{% content-ref url="/pages/A4PwwNMtgTasLUXnsgux" %}
[BLAST Node Operators](/developer-docs/blast-node-operators)
{% endcontent-ref %}
{% content-ref url="/pages/tZSGqGVSbUynsm3V3BV3" %}
[Node Operator Guide](/developer-docs/blast-node-operators/node-operator-guide)
{% endcontent-ref %}
{% content-ref url="/pages/yXk0NmXXcNS49DdKvnzZ" %}
[Building a Node from Source](/developer-docs/blast-node-operators/building-a-node-from-source)
{% endcontent-ref %}
# Quick Start
### Where should I start?
\
If you're brand new to BLAST Mainnet, we recommend checking out the [guide to deploying a basic contract (opens new window)](https://github.com/BLASTchain/blast-tutorial/tree/main/getting-started)It'll get you familiar with the core steps required to get a contract deployed to the network. Luckily, BLAST Mainnet is [EVM equivalent (opens new window)](https://medium.com/ethereum-optimism/introducing-evm-equivalence-5c2021deb306), so it's 100% the same as deploying a contract to Ethereum.
If you're a bit more familiar with BLAST and Ethereum, you can try walking through one of the various [tutorials (opens new window)](https://github.com/BLASTchain/blast-tutorial.git)put together by the Blast community. They'll help you get a headstart when building your first Optimistic project.
If you need testnet ETH, you can use our Superchain Faucet (opens new window)or check out these other network faucets options.
### [#](https://community.optimism.io/docs/guides/#guides)Guides
These guides provide integration guidelines for specific topics. They are intended as one stop shops, and should have all the relevant information you need for completing a specific type of integration, from network information and tutorials to tips and tricks.
We're aiming to maintain guides for many of the common interactions that developers might have with BLAST Mainnet. For example, we have guides for adding BLAST Mainnet support to a wallet or a CEX. We also have guides for getting your [token onto the standard bridge (opens new window)](https://github.com/BLASTchain/blast-tutorial/tree/main/standard-bridge-standard-token)or even [writing your own custom bridge](https://community.optimism.io/docs/guides/bridge-dev.html).
Take a look at the list on the left for a complete list of the guides we've created so far.
#### [#](https://community.optimism.io/docs/guides/#want-a-specific-guide-added)Want a specific guide added?
# Testing on Blast Test Networks
You can find the chainid and supporting information for OP Goerli, our test network, [using these endpoints](https://community.optimism.io/docs/useful-tools/networks.html). To obtain ETH and tokens (both ERC-20 and NFT) from faucets, [see here](https://community.optimism.io/docs/useful-tools/faucets.html).
This page shows some additional testing utilities that you might find useful.
### The bridge
The `OUTb` token is supported by the bridge on Goerli. See [this tutorial ](https://github.com/BLASTchain/blast-tutorial/tree/main/cross-dom-bridge-erc20)
# BLAST Node Operators
Node Operator GuildeBuilding a Node from SourceRunning OP Mainnet from Source
# Node Operator Guide
This document provides an overview of how to deploy an BLAST node. To learn more about how Bedrock itself works and its motivations, please see [the specs on GitHub (opens new window)](https://github.com/BLASTchain/blast/tree/master/specs). If you want to skip ahead to building and running a node from source, please see [Building a Node from Source](/developer-docs/blast-node-operators/building-a-node-from-source)
### [#](https://community.optimism.io/docs/developers/bedrock/node-operator-guide/#deployment-overview)Deployment Overview
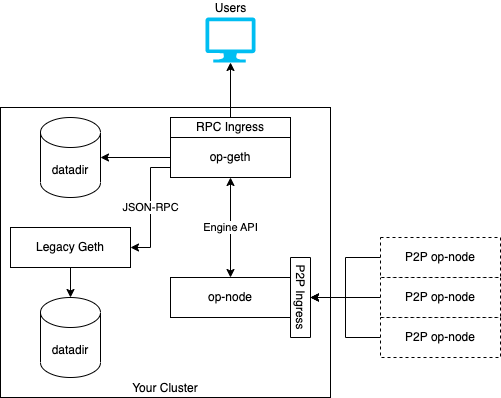
A Bedrock deployment consists of two core components:
1. The Rollup Node, which is responsible for deriving blocks from L1 and passing them to the Execution engine. It also participates in a peer-to-peer network that synchronizes unsubmitted blocks as the sequencer creates them. We refer to this component as `bl-node`.
2. The Execution Engine, which is responsible for executing the blocks it receives from the rollup node and storing state. It also exposes standard JSON-RPC methods to query blockchain data and submit transactions to the network. We refer to this component as `op-geth`, since our Execution Engine is [a minimal fork (opens new window)](https://op-geth.optimism.io/)of `go-ethereum`.
The Rollup Node and Execution Engine communicate with each other over JSON-RPC via the Engine API. This is similar to how regular Ethereum networks are deployed. The Rollup Node functions as Optimism's consensus client, and the Execution Engine as its execution client.
For BLAST Mainnet and BLAST Goerli, you may also need to run a third component called Legacy Geth. Legacy Geth is used to serve execution traces for transactions prior to the Bedrock upgrade, which we refer to as "historical transactions". When the Rollup Node encounters an RPC call that requires historical execution traces, it will forward the request to Legacy Geth. Note, however, that unlike our previous networks requests for historical *data* will be served by the Execution Engine directly. This distinction will be clarified later on in this document.
The architecture of a typical Bedrock deployment looks like this:
### [#](https://community.optimism.io/docs/developers/bedrock/node-operator-guide/#system-requirements)System Requirements
We recommend the following minimum system requirements to run Bedrock:
* `bl-node`: Minimum 2CPUs, 4GB RAM. No storage is necessary.
* `op-geth`: Minimum 4 CPUs, 8GB RAM. At least 40GB of storage is required for BLAST Goerli or BLAST Sepolia. At least 500GB of storage is required for mainnet. Storage must be SSD. Requirements are significantly higher for archive nodes.
### [#](https://community.optimism.io/docs/developers/bedrock/node-operator-guide/#getting-the-software)Getting the Software
`op-geth` and `bl-node` are available as Docker images. Consult the [documentation](https://community.optimism.io/docs/developers/bedrock/public-testnets.html) for the network you are participating in to get the correct image tag.
You can also compile `op-geth` and `op-node` from source.
### [#](https://community.optimism.io/docs/developers/bedrock/node-operator-guide/#node-configuration)Node Configuration
Note
Always run `bl-node` and `op-geth` in a one-to-one configuration. Don't run multiple `op-geth` instances behind one `bl-node`, or vice versa.
To configure your node, you will need to do the following:
1. Configure `bl-node` to point to the correct L1, `op-geth`, and L2 network.
2. Initialize `op-geth` with the correct network parameters.
3. Configure `op-geth` to properly communicate with the Rollup Node.
4. Optionally, configure Legacy Geth.
#### [#](https://community.optimism.io/docs/developers/bedrock/node-operator-guide/#configuring-op-geth)Configuring op-geth
{% hint style="info" %}
Tips
Even though the Docker image for the Execution Engine is called `op-geth`, the actually binary is still called `geth` in order to minimize differences between `op-geth` and `go-ethereum`.
{% endhint %}
We'll start with `op-geth`'s configuration because it is more complex. As mentioned before, `op-geth` is a minimal fork of `go-ethereum`. As a result, it stores its state in a database that requires initialization. Initialization is done one of two ways, depending on which network you're deploying:
1. **With a Genesis File:** This is for BLAST Goerli, and other testnets or deployments that are not migrated from a legacy network. In this case, you'll download the [genesis file (opens new window)](https://raw.githubusercontent.com/BLASTchain/blast-network/main/blast-goerli/genesis.json)and initialize the data directory via `geth init`.
2. **With a Data Directory:** This is used for networks that are migrated from a legacy network. This would include BL Mainnet and BL Goerli. In this case, you'll download a preconfigured data directory and extract it. No further initialization is necessary in this case, because the data directory contains the network's genesis information.
Regardless of how `op-geth` is initialized, you'll need to ensure that you have sufficient disk space available to store the network's data. As of this writing, the mainnet data directory is \~100GB for a full node and \~1TB for an archival node. The BL Goerli data directory is \~40GB for a full node.
Instructions for each initialization method are below. If you're spinning up an BL Mainnet or BL Goerli node, use the [Initialization via Data Directory](https://community.optimism.io/docs/developers/bedrock/node-operator-guide/#initialization-via-data-directory) path
[**#**](https://community.optimism.io/docs/developers/bedrock/node-operator-guide/#initialization-via-genesis-file)**Initialization via Genesis File**
`op-geth` uses JSON files to encode a network's genesis information. For networks that are initialized in this way, you'll receive a URL to the genesis JSON. You'll need to download the genesis JSON, then run the following command to initialize the data directory:
```
#!/bin/sh
FILE=/$DATADIR/genesis.json
OP_GETH_GENESIS_URL=https://networks.optimism.io/op-sepolia/genesis.json
if [ ! -s $FILE ]; then
apk add curl
curl $OP_GETH_GENESIS_URL -o $FILE
geth init --datadir /db $FILE
else
echo "Genesis file already exists. Skipping initialization."
fi
```
[**#**](https://community.optimism.io/docs/developers/bedrock/node-operator-guide/#initialization-via-data-directory)**Initialization via Data Directory**
To initialize `op-geth` with a preconfigured data directory, simply download and extract the data directory to a place of your choosing. The data directory is exported as a tar file. An example command to do this is below:
```
curl -o -sL
tar -xvf
```
[**#**](https://community.optimism.io/docs/developers/bedrock/node-operator-guide/#configuration)**Configuration**
Once `op-geth` is initialized, it can be configured via CLI flags. `op-geth` accepts all the [standard `go-ethereum` flags (opens new window)](https://geth.ethereum.org/docs/interface/command-line-options)as well as a few extra flags that are specific to Optimism. These flags are:
* `--rollup.historicalrpc`: Enables the historical RPC endpoint. This endpoint is used to fetch historical execution data from Legacy Geth. This flag is only necessary for upgraded networks.
* `--rollup.sequencerhttp`: HTTP endpoint of the sequencer. `op-geth` will route `eth_sendRawTransaction` calls to this URL. Bedrock does not currently have a public mempool, so this is required if you want your node to support transaction submission. Consult the documentation for the network you are participating in to get the correct URL.
* `--rollup.disabletxpoolgossip`: Disables transaction pool gossiping. While not required, it's useful to set this to `true` since transaction pool gossip is currently unsupported.
To communicate with `bl-node` and enable the Engine API, you'll also need to generate a JWT secret file and enable Geth's authenticated RPC endpoint.
To generate the JWT secret, run the following:
```
openssl rand -hex 32 > jwt.txt
```
Then, specify the following flags:
* `--authrpc.addr`: Sets the address `op-geth`'s authenticated RPC should listen on.
* `--authrpc.port`: Sets the port `op-geth`'s authenticated RPC should listen on. The default value is `8551`.
* `--authrpc.jwtsecret`: Sets the path to a JWT secret file you generated above.
* `--syncmode=full`: This prevents Geth from attempting to snap sync. Snap sync is currently unsupported, but will be enabled shortly after the mainnet upgrade.
* `--maxpeers=0`: This prevents Geth from peering with other Geth nodes. Execution-layer peering is currently unsupported, but will be added as part of enabling snap sync.
* `--nodiscover`: This disables Geth's peer discovery mechanism. Execution-layer discovery is currently unsupported, but will be added as part of enabling snap sync.
[**#**](https://community.optimism.io/docs/developers/bedrock/node-operator-guide/#optional-op-geth-configuration)**Optional op-geth Configuration**
You may also want to specify the following flags based on your configuration:
* `--authrpc.vhosts`: Whitelists which hosts (as defined in the `Host` header) are allowed to access the authenticated RPC endpoint. This is useful if you're running `op-geth` on containerized infrastructure. The default value is `localhost`.
* `--http.vhosts`: Whitelists which hosts (as defined in the `Host` header) are allowed to access the unauthenticated RPC endpoint. This is useful if you're running `op-geth` on containerized infrastructure. The default value is `localhost`.
* `--http`, `--http.addr`, and `--http.port`: Enables the unauthenticated RPC endpoint, configures its address, and configures its port. You'll almost certainly want to specify these, since they will enable Geth's JSON-RPC endpoint.
* `--ws`, `--ws.addr`, and `--ws.port`: Enables the WebSocket API.
* `--verbosity`: Configures Geth's log level. This is a number between 0 and 5, with 5 being the most verbose. Defaults to 3.
[**#**](https://community.optimism.io/docs/developers/bedrock/node-operator-guide/#working-base-configuration)**Working Base Configuration**
A valid command that runs `op-geth` and enables RPC over HTTP and WebSockets looks like:
```
geth \
--ws \
--ws.port=8546 \
--ws.addr=localhost \
--ws.origins="*" \
--http \
--http.port=8545 \
--http.addr=localhost \
--http.vhosts="*" \
--http.corsdomain="*" \
--authrpc.addr=localhost \
--authrpc.jwtsecret=/var/secrets/jwt.txt \
--authrpc.port=8551 \
--authrpc.vhosts="*" \
--datadir=/data \
--verbosity=3 \
--rollup.disabletxpoolgossip=true \
--rollup.sequencerhttp=https://mainnet-sequencer.blastblockchain.com/ \
--nodiscover \
--syncmode=full \
--maxpeers=0
```
Consult [Geth's documentation (opens new window)](https://geth.ethereum.org/docs/)for more information on customizing `op-geth`'s behavior.
#### [#](https://community.optimism.io/docs/developers/bedrock/node-operator-guide/#configuring-op-node)Configuring bl-node
`bl-node` is a standalone, statically linked binary. It stores no state, and requires no initialization. It consumes configuration parameters either via the command line or environment variables. For some networks, the Rollup Node also requires a configuration file (called `rollup.json` or the "rollup config") that configures network-specific genesis parameters. For official networks like OP Goerli, OP Sepolia, and OP Mainnet, the genesis config is hardcoded in the `bl-node` software and can be specified via a `--network` flag.
A minimal valid configuration for a rollup node on our `op goerli`testnet looks like this:
```
bl-node --l1= \
--l2= \
--rollup.config=./rollup.json \
--rpc.addr=127.0.0.1 \
--rpc.port=9545 \
--l2.jwt-secret=
```
Each of the above flags can also be defined via an environment variable. Run `bl-node --help` to see a list of all available flags and environment variables.
[**#**](https://community.optimism.io/docs/developers/bedrock/node-operator-guide/#configuring-peer-to-peer-networking)**Configuring Peer-to-Peer Networking**
Unlike the previous system, the `bl-node` participates in a peer-to-peer network. This network is used to distribute blocks that have not been submitted to L1 yet. The `bl-node` will automatically discover and connect to peers using a hardcoded set of bootnodes. You can also manually specify peers to connect to via the `--p2p.static` flag.
For best results, run `op-node` with a static IP address that is accessible from the public Internet. For Kubernetes deployments, this can be achieved by configuring a dedicated `Ingress` with an external IP, and using the `--p2p.advertise.ip` flag to specify the IP address of the load balancer when advertising IP addresses to peers.
The default port for the peer-to-peer network is `9003`. You will need to open this port on your firewall to receive unsubmitted blocks. For your node to be discoverable, this port must be accessible via both TCP and UDP protocols.
#### [#](https://community.optimism.io/docs/developers/bedrock/node-operator-guide/#legacy-geth)Legacy Geth
If you are running a node for an upgraded network like BL Mainnet or BL Goerli, you will also need to run Legacy Geth in order to serve historical execution traces. Fundamentally, Legacy Geth is our old `l2geth` binary running against a preconfigured data directory. To configure Legacy Geth, follow the instructions above for using a preconfigured data directory, then execute the following command:
Warning
It is imperative that you specify the `USING_OVM=true` environment variable in the command below. Failing to specify this will cause `l2geth` to return invalid execution traces, or panic at startup.
```
USING_OVM=true \
ETH1_SYNC_SERVICE_ENABLE=false \
RPC_API=eth,rollup,net,web3,debug \
RPC_ADDR=0.0.0.0 \
RPC_CORS_DOMAIN=* \
RPC_ENABLE=true \
RPC_PORT=8545 \
RPC_VHOSTS=* \
geth --datadir
```
This command is the minimum required to run Legacy Geth and expose a functioning RPC endpoint. As before, `l2geth` takes all standard `go-ethereum` flags so you can customize the configuration as needed.
As mentioned above, don't forget to specify `--rollup.historicalrpc` on `op-geth` to properly route requests for historical execution to Legacy Geth.
Since Legacy Geth is read-only, it is safe to run multiple Legacy Geth nodes behind a load balancer.
[**#**](https://community.optimism.io/docs/developers/bedrock/node-operator-guide/#historical-execution-vs-historical-data-routing)**Historical Execution vs. Historical Data Routing**
Only requests for historical execution will be routed to Legacy Geth. Everything else will be served by `op-geth` directly. The term *historical execution* refers to RPC methods that need to execute transactions prior to bedrock (not just read data from the database):
* `eth_call`
* `eth_estimateGas`
* `debug_traceBlockByNumber`
* `debug_traceBlockByHash`
* `debug_traceCall`
* `debug_traceTransaction`
If you do not need these RPC methods for historical data, then you do not need to run Legacy Geth at all.
### [#](https://community.optimism.io/docs/developers/bedrock/node-operator-guide/#troubleshooting)Troubleshooting
#### [#](https://community.optimism.io/docs/developers/bedrock/node-operator-guide/#_401-unauthorized-signature-invalid)401 Unauthorized: Signature Invalid
If you see a log that looks like this in `op-node`:
```
WARN [12-13|15:53:20.263] Derivation process temporary error attempts=80 err="stage 0 failed resetting: temp: failed to find the L2 Heads to start from: failed to fetch current L2 forkchoice state: failed to find the finalized L2 block: failed to determine L2BlockRef of finalized, could not get payload: 401 Unauthorized: signature is invalid
```
1
It means that the `bl-node` is unable to authenticate with `op-geth`'s authenticated RPC using the JWT secret. To fix:
1. Check that the JWT secret is correct in both services.
2. Check that `op-geth`'s authenticated RPC is enabled, and that the URL is correct.
#### [#](https://community.optimism.io/docs/developers/bedrock/node-operator-guide/#_403-forbidden-invalid-host-specified)403 Forbidden: Invalid Host Specified
If you see a log that looks like this in `bl-node`:
```
{"err":"403 Forbidden: invalid host specified\n","lvl":"error","msg":"error getting latest header","t":"2022-12-13T22:29:18.932833159Z"}
```
It means that you have not whitelisted `op-node`'s host with `op-geth`. To fix:
1. Make sure that the `--authrpc.vhosts` parameter in `op-geth` is either set to the correct host, or `*`.
2. Check that `op-geth`'s authenticated RPC is enabled, and that the URL is correct.
#### [#](https://community.optimism.io/docs/developers/bedrock/node-operator-guide/#failed-to-load-p2p-config)Failed to Load P2P Config
If you see a log that looks like this in `bl-node`:
```
CRIT [12-13|13:46:21.386] Application failed message="failed to load p2p config: failed to load p2p discovery options: failed to open discovery db: mkdir /p2p: permission denied"
```
It means that the `op-node` does not have write access to the P2P discovery or peerstore directories. To fix:
1. Make sure that the `op-node` has write access to the P2P directory. By default, this is `/p2p`.
2. Set the P2P directory to somewhere the `op-node` can access via the `--p2p.discovery.path` and `--p2p.peerstore.path` parameters.
3. Set the discovery path to `memory` to disable persistence via the `--p2p.discovery.path` and `--p2p.peerstore.path` parameters.
#### [#](https://community.optimism.io/docs/developers/bedrock/node-operator-guide/#wrong-chain)Wrong Chain
If you see a log that looks like this in `op-node`:
```
{"attempts":183,"err":"stage 0 failed resetting: temp: failed to find the L2 Heads to start from: wrong chain L1: genesis: 0x4104895a540d87127ff11eef0d51d8f63ce00a6fc211db751a45a4b3a61a9c83:8106656, got 0x12e2c18a3ac50f74d3dd3c0ed7cb751cc924c2985de3dfed44080e683954f1dd:8106656","lvl":"warn","msg":"Derivation process temporary error","t":"2022-12-13T23:31:37.855253213Z"}
```
It means that the `bl-node` is pointing to the wrong chain. To fix:
1. Verify that the `bl-node`'s L1 URL is pointing to the correct L1 for the given network.
2. Verify that the `bl-node`'s rollup config/`--network` parameter is set to the correct network.
3. Verify that the `bl-node`'s L2 URL is pointing to the correct instance of `op-geth`, and that `op-geth` is properly initialized for the given network.
# Building a Node from Source
Here are the instructions if you want to build you own node without relying on our images. These instructions were generated on an Ubuntu 20.04 LTS box, but they should work with other systems too.
## Prerequisites
### [#](https://community.optimism.io/docs/developers/nodes/intro/#hardware-requirements)Hardware requirements
Nodes need to process and store the transaction history of BLAST Mainnet or BLAST Goerli. They need to be relatively powerful machines (real or virtual). We recommend at least 16 GB RAM. We recommend a 1TB SSD for BLAST Mainnet, our current archive node usage is \~500GB. We recommend a 100GB SSD for BLAST Goerli, or current full node usage is \~1.6GB and archive node usage is \~5.6GB.
### [#](https://community.optimism.io/docs/developers/nodes/intro/#software-requirements)Software requirements
You’ll need the following software installed to follow this tutorial:
* [Git(opens new window)](https://git-scm.com/)
* [Go(opens new window)](https://go.dev/)
* [nvm(opens new window)](https://github.com/nvm-sh/nvm)
* [Node(opens new window)](https://nodejs.org/en)
* [Pnpm(opens new window)](https://pnpm.io/)
* [Foundry(opens new window)](https://github.com/foundry-rs/foundry#installation)
* [Make(opens new window)](https://linux.die.net/man/1/make)
* [jq(opens new window)](https://github.com/jqlang/jq)
* [direnv(opens new window)](https://direnv.net/)
* [zstd(opens new window)](https://facebook.github.io/zstd/)
This tutorial was checked on:
| Software | Version | Installation command(s) | |
| ----------------------------- | ---------- | ---------------------------------------------------------------------------------------------------------------------------------------------------------------------------------------------------------------------------------------------------------------------------- | ------------------------------------------------------------------------ |
| Ubuntu | 20.04 LTS | | |
| git, curl, jq, make, and zstd | OS default |
|
### [#](https://community.optimism.io/docs/developers/nodes/intro/#building-the-software)Building the software
#### [#](https://community.optimism.io/docs/developers/nodes/intro/#build-the-optimism-monorepo)Build the Blast Monorepo
1. Navigate to your working directory.
2. Clone the [Blast Monorepo (opens new window)](https://github.com/BLASTchain/blast.git).
```
git clone https://github.com/BLASTchain/blast.git
```
3. Install required modules.
```
cd blast
pnpm install
```
4. Build the various packages inside of the Blast Monorepo.
```
make bl-node
pnpm build
```
This process will take some time, so you can move onto the next section while the build completes.
#### [#](https://community.optimism.io/docs/developers/nodes/intro/#build-op-geth)Build op-geth
1. Navigate to your working directory.
2. Clone [`op-geth` (opens new window)](https://github.com/BLASTchain/op-geth):
```
git clone https://github.com/BLASTchain/op-geth.git
```
3. Build `op-geth`:
```
cd op-geth
make geth
```
# Running BLAST Mainnet from Source
[**Please follow these steps first if you have not done so already.**](/developer-docs/blast-node-operators/building-a-node-from-source)
#### [#](https://community.optimism.io/docs/developers/nodes/mainnet/#get-the-data-directory)Get the data directory
The next step is to download the data directory for `op-geth`. You will need 500+ GB for this part alone.
1. Download the data directory snapshot. This is a large file so expect it to take some time. Bedrock Data Directory (XXGB)(opens new window)
2. Check the validity of your download. This is an important step. Corrupted data directories will make your node fail. So ensure your checksum matches.
```
sha256sum mainnet-bedrock.tar.zst
# expected output
ec4baf47e309a14ffbd586dc85376833de640c0f2a8d7355cb8a9e64c38bfcd1 mainnet-bedrock.tar.zst
```
OR
```
sha512sum mainnet-bedrock.tar.zst
# expected output
c17067b7bc39a6daa14f71d448c6fa0477834c3e68a25e96f26fe849c12a09bffe510e96f7eacdef19e93e3167d15250f807d252dd6f6f9053d0e4457c73d5fb mainnet-bedrock.tar.zst
```
3. Create the data directory in `op-geth` and fill it. This will take time.
Navigate into your `op-geth` directory and run these commands:
```
mkdir datadir
cd datadir
tar xvf <>
```
#### [#](https://community.optimism.io/docs/developers/nodes/mainnet/#create-a-shared-secret-between-op-geth-and-op-node)Create a shared secret between `op-geth` and `op-node`
1. Navigate into your `op-geth` directory and run these commands:
```
openssl rand -hex 32 > jwt.txt
cp jwt.txt ../optimism/op-node
```
#### [#](https://community.optimism.io/docs/developers/nodes/mainnet/#scripts-to-start-the-different-components)Scripts to start the different components
In the root of your working directory create a new directory: `scripts`.
#### [#](https://community.optimism.io/docs/developers/nodes/mainnet/#op-geth)`op-geth`
1. Navigate into your `scripts` directory:
2. Create a new file:
```
touch run-op-geth.sh
```
3. Make it executable:
```
chmod +x run-op-geth.sh
```
4. Insert this snippet of code into `run-op-geth.sh` and modify the path to the `op-geth` directory.
```
#! /usr/bin/bash
SEQUENCER_URL=https://mainnet-sequencer.blastblockchain.com/
cd <>
./build/bin/geth \
--datadir=./datadir \
--http \
--http.port=8545 \
--http.addr=0.0.0.0 \
--authrpc.addr=localhost \
--authrpc.jwtsecret=./jwt.txt \
--verbosity=3 \
--rollup.sequencerhttp=$SEQUENCER_URL \
--nodiscover \
--syncmode=full \
--maxpeers=0
```
Archive Nodes
You will also need to add `--gcmode archive`.
1. Run the following command to start `op-geth`:
```
./run-op-geth.sh
```
#### [#](https://community.optimism.io/docs/developers/nodes/mainnet/#op-node)`bl-node`
1. Navigate to the `scripts` directory you created.
2. Create a new file:
```
touch run-op-node.sh
```
3. Make it executable:
```
chmod +x run-op-node.sh
```
4. Insert this snippet of code into `run-bl-node.sh`:
```
#!/usr/bin/bash
L1URL=<< L1 RPC URL >>
L1KIND=basic
NET=mainnet
cd <>
./bin/op-node \
--l1=$L1URL \
--l1.rpckind=$L1KIND \
--l2=ws://localhost:8551 \
--l2.jwt-secret=./jwt.txt \
--network=$NET \
--rpc.addr=0.0.0.0 \
--rpc.port=8547
```
* Change `<< L1 RPC URL >>` to your local L1 node or a service provider's URL for the L1 node (L1 Ethereum). E.g. for Infura, `https://mainnet.infura.io/v3/API_KEY`.
* Set `L1KIND` to the network provider you are using (options: alchemy, quicknode, infura, parity, nethermind, debug\_geth, erigon, basic, any).
5. Run the following command to start `bl-node`:
```
./run-op-node.sh
```
#### [#](https://community.optimism.io/docs/developers/nodes/mainnet/#the-initial-synchronization)The initial synchronization
The datadir provided by Blast is not updated continuously, so before you can use the node you need a to synchronize it.
During that process you get log messages from `bl-node`, and nothing else appears to happen.
```
INFO [06-26|13:31:20.389] Advancing bq origin origin=17171d..1bc69b:8300332 originBehind=false
```
That is normal - it means that `bl-node` is looking for a location in the batch queue. After a few minutes it finds it, and then it can start synchronizing.
While it is synchronizing, you can expect log messages such as these from `bl-node`:
```
INFO [06-26|14:00:59.460] Sync progress reason="processed safe block derived from L1" l2_finalized=ef93e6..e0f367:4067805 l2_safe=7fe3f6..900127:4068014 l2_unsafe=7fe3f6..900127:4068014 l2_time=1,673,564,096 l1_derived=6079cd..be4231:8301091
INFO [06-26|14:00:59.460] Found next batch epoch=8e8a03..11a6de:8301087 batch_epoch=8301087 batch_timestamp=1,673,564,098
INFO [06-26|14:00:59.461] generated attributes in payload queue txs=1 timestamp=1,673,564,098
INFO [06-26|14:00:59.463] inserted block hash=e80dc4..72a759 number=4,068,015 state_root=660ced..043025 timestamp=1,673,564,098 parent=7fe3f6..900127 prev_randao=78e43d..36f07a fee_recipient=0x4200000000000000000000000000000000000011 txs=1 update_safe=true
```
And log messages such as these from `op-geth`:
```
INFO [06-26|14:02:12.974] Imported new potential chain segment number=4,068,194 hash=a334a0..609a83 blocks=1 txs=1 mgas=0.000 elapsed=1.482ms mgasps=0.000 age=5mo2w20h dirty=2.31MiB
INFO [06-26|14:02:12.976] Chain head was updated number=4,068,194 hash=a334a0..609a83 root=e80f5e..dd06f9 elapsed="188.373µs" age=5mo2w20h
INFO [06-26|14:02:12.982] Starting work on payload id=0x5542117d680dbd4e
```
[**#**](https://community.optimism.io/docs/developers/nodes/mainnet/#how-long-will-the-synchronization-take)**How long will the synchronization take?**
To estimate how long the synchronization will take, you need to first find out how many blocks you synchronize in a minute. You can use this [Foundry (opens new window)](https://book.getfoundry.sh/)script to get an estimated sync time.
1. Navigate to your `scripts` directory
2. Create a new file:
```
touch run-estimate.sh
```
3. Make it executable:
```
chmod +x run-estimate.sh
```
4. Insert this snippet of code into `run-estimate.sh`:
```
#!/usr/bin/bash
export ETH_RPC_URL=http://localhost:8545
CHAIN_ID=`cast chain-id`
echo Chain ID: $CHAIN_ID
echo Please wait
if [ $CHAIN_ID -eq 238]; then
L2_URL=https://rpc.blastblockchain.com
fi
if [ $CHAIN_ID -eq 239]; then
L2_URL=https://testnet-rpc.blastblockchain.com
fi
T0=`cast block-number --rpc-url $ETH_RPC_URL` ; sleep 60 ; T1=`cast block-number --rpc-url $ETH_RPC_URL`
PER_MIN=`expr $T1 - $T0`
echo Blocks per minute: $PER_MIN
if [ $PER_MIN -eq 0 ]; then
echo Not synching
exit;
fi
# During that minute the head of the chain progressed by thirty blocks
PROGRESS_PER_MIN=`expr $PER_MIN - 30`
echo Progress per minute: $PROGRESS_PER_MIN
# How many more blocks do we need?
HEAD=`cast block-number --rpc-url $L2_URL`
BEHIND=`expr $HEAD - $T1`
MINUTES=`expr $BEHIND / $PROGRESS_PER_MIN`
HOURS=`expr $MINUTES / 60`
echo Hours until sync completed: $HOURS
if [ $HOURS -gt 24 ] ; then
DAYS=`expr $HOURS / 24`
echo Days until sync complete: $DAYS
fi
```
5. Run the following command to get an estimate:
```
./run-estimate.sh
```
#### [#](https://community.optimism.io/docs/developers/nodes/mainnet/#operations)Operations
It is best to start `op-geth` first and shut it down last.
# Running BLAST Testnet from Source
[**Please follow these steps first if you have not done so already.**](/developer-docs/blast-node-operators/building-a-node-from-source)
### Create a shared secret between `op-geth` and `bl-node`
1. Navigate into your `op-geth` directory and run these commands:
```sh
openssl rand -hex 32 > jwt.txt
cp jwt.txt ../blast/bl-node
```
### Scripts to start the different components
In the root of your working directory create a new directory: `scripts`.
#### # `op-geth`
2. Create a new file:
```sh
touch run-op-geth.sh
```
3. Make it executable:
```sh
chmod +x run-op-geth.sh
```
4. Insert this snippet of code into `run-op-geth.sh` and modify the path to the `op-geth` directory.
```
#! /usr/bin/bash
SEQUENCER_URL=https://goerli-sequencer.blastblockchain.com/
cd <>
./build/bin/geth
--datadir=./datadir
--http
--http.port=8545
--http.addr=0.0.0.0
--authrpc.addr=localhost
--authrpc.jwtsecret=./jwt.txt
--verbosity=3
--rollup.sequencerhttp=$SEQUENCER_URL
--nodiscover
--syncmode=full
--maxpeers=0
```
Other Sequencer URLs can be found here: Networks, Public RPC Endpoints, & APIs.
1. Run the following command to start `op-geth`:
```
./run-op-geth.sh
```
### `op-node`
1. Navigate to the `scripts` directory you created.
2. Create a new file:
```
touch run-bl-node.sh
```
3. Make it executable:
```
chmod +x run-bl-node.sh
```
4. Insert this snippet of code into `run-bl-node.sh`:
```sh
#!/usr/bin/bash
L1URL=<< L1 RPC URL >>
L1KIND=basic
cd <>
./bin/bl-node \
--l1=$L1URL \
--l1.rpckind=$L1KIND \
--l2=ws://localhost:8551 \
--l2.jwt-secret=./jwt.txt \
--network=$NET \
--rpc.addr=0.0.0.0 \
--rpc.port=8547 \
--rollup.config=./rollup.json
```
* Change `<< L1 RPC URL >>` to your local L1 node or a service provider's URL for the L1 node (L1 Ethereum). E.g. for Infura, `https://goerli.infura.io/v3/API_KEY`.
* Set `L1KIND` to the network provider you are using (options: alchemy, quicknode, infura, parity, nethermind, debug\_geth, erigon, basic, any).
5. Run the following command to start `op-node`:
```
./run-op-node.sh
```
## The initial synchronization
The datadir provided by Blast is not updated continuously, so before you can use the node you need a to synchronize it.
During that process you get log messages from `bl-node`, and nothing else appears to happen.
```
INFO [06-26|13:31:20.389] Advancing bq origin origin=17171d..1bc69b:8300332 originBehind=false
```
That is normal - it means that `bl-node` is looking for a location in the batch queue. After a few minutes it finds it, and then it can start synchronizing.
While it is synchronizing, you can expect log messages such as these from `bl-node`:
```
INFO [06-26|14:00:59.460] Sync progress reason="processed safe block derived from L1" l2_finalized=ef93e6..e0f367:4067805 l2_safe=7fe3f6..900127:4068014 l2_unsafe=7fe3f6..900127:4068014 l2_time=1,673,564,096 l1_derived=6079cd..be4231:8301091
INFO [06-26|14:00:59.460] Found next batch epoch=8e8a03..11a6de:8301087 batch_epoch=8301087 batch_timestamp=1,673,564,098
INFO [06-26|14:00:59.461] generated attributes in payload queue txs=1 timestamp=1,673,564,098
INFO [06-26|14:00:59.463] inserted block hash=e80dc4..72a759 number=4,068,015 state_root=660ced..043025 timestamp=1,673,564,098 parent=7fe3f6..900127 prev_randao=78e43d..36f07a fee_recipient=0x4200000000000000000000000000000000000011 txs=1 update_safe=true
```
And log messages such as these from `op-geth`:
```
INFO [06-26|14:02:12.974] Imported new potential chain segment number=4,068,194 hash=a334a0..609a83 blocks=1 txs=1 mgas=0.000 elapsed=1.482ms mgasps=0.000 age=5mo2w20h dirty=2.31MiB
INFO [06-26|14:02:12.976] Chain head was updated number=4,068,194 hash=a334a0..609a83 root=e80f5e..dd06f9 elapsed="188.373µs" age=5mo2w20h
INFO [06-26|14:02:12.982] Starting work on payload id=0x5542117d680dbd4e
```
[**#**](https://community.optimism.io/docs/developers/nodes/testnet/#how-long-will-the-synchronization-take)**How long will the synchronization take?**
To estimate how long the synchronization will take, you need to first find out how many blocks you synchronize in a minute. You can use this [Foundry (opens new window)](https://book.getfoundry.sh/)script to get an estimated sync time.
1. Navigate to your `scripts` directory
2. Create a new file:
```
touch run-estimate.sh
```
3. Make it executable:
```
chmod +x run-estimate.sh
```
4. Insert this snippet of code into `run-estimate.sh`:
```
#!/usr/bin/bash
export ETH_RPC_URL=http://localhost:8545
CHAIN_ID=`cast chain-id`
echo Chain ID: $CHAIN_ID
echo Please wait
if [ $CHAIN_ID -eq 238 ]; then
L2_URL=https://rpc.blastblockchain.com
fi
if [ $CHAIN_ID -eq 23888 ]; then
L2_URL=https://testnet-rpc.blastblockchain.com
fi
T0=`cast block-number --rpc-url $ETH_RPC_URL` ; sleep 60 ; T1=`cast block-number --rpc-url $ETH_RPC_URL`
PER_MIN=`expr $T1 - $T0`
echo Blocks per minute: $PER_MIN
if [ $PER_MIN -eq 0 ]; then
echo Not synching
exit;
fi
# During that minute the head of the chain progressed by thirty blocks
PROGRESS_PER_MIN=`expr $PER_MIN - 30`
echo Progress per minute: $PROGRESS_PER_MIN
# How many more blocks do we need?
HEAD=`cast block-number --rpc-url $L2_URL`
BEHIND=`expr $HEAD - $T1`
MINUTES=`expr $BEHIND / $PROGRESS_PER_MIN`
HOURS=`expr $MINUTES / 60`
echo Hours until sync completed: $HOURS
if [ $HOURS -gt 24 ] ; then
DAYS=`expr $HOURS / 24`
echo Days until sync complete: $DAYS
fi
```
5. Run the following command to get an estimate:
```
./run-estimate.sh
```
#### [#](https://community.optimism.io/docs/developers/nodes/testnet/#operations)Operations
It is best to start `op-geth` first and shut it down last.
# Using Blast Bridge
How to deposit and withdraw assets using official Blast Bridge
You can use the [Testnet bridge](https://testnet-bridge.blastblockchain.com/) to get acquainted with the UI of the official Blast bridge. The official [Blast Bridge on Mainnet](https://bridge.blastblockchain.com/) operates in exactly the same way connecting to Ethereum Mainnet.
## Deposit ETH from L1 to Blast
Follow the steps below to deposit your tokens from Goerli to Blast Testnet:
1. Navigate to the [testnet bridge](https://testnet-bridge.blastblockchain.com/) and connect your wallet by clicking on the button in the top-right.
2. Select the "Deposit" tab and enter the amount of $ETH you want to bridge over to Blast Testnet, Enter an amount to deposit and then click on the Deposit button at the bottom to proceed with token approval.
3. Confirm your transaction on the Metamask
Once complete the balance will be reflected in your L2 testnet wallet.
## Withdraw to L1
Follow the steps below to withdraw your tokens from Blast Testnet to Goerli:
1. Navigate to the [testnet bridge](https://testnet-bridge.blastblockchain.com/) and connect your wallet by clicking on the button in the top-right.
2. Select the "Withdraw" tab and enter the amount of $ETH you want to bridge over to Goerli, and then click on the "Withdraw" button at the bottom.
3. Confirm your transaction on Metamask
4. Once you initiate the withdrawal process, make sure to confirm the transaction using Metamask. Access the "View Withdrawals" menu
5. Navigate to the "View Withdrawals" section in your account. Wait for the system to confirm the withdrawal status
6. Patience is key. Allow the system some time to confirm the status of your withdrawal. Perform proof to confirm the withdrawal
7. After the withdrawal status is confirmed, proceed to perform the necessary proof to validate the withdrawal. Wait for the challenge period and execute a claim to receive your ETH on L1
8. Be patient during the challenge period. Once it concludes, execute the claim process to receive your ETH on the Layer 1 (L1) network.
Feel free to adjust the wording based on the specific context or terminology used in your guide.
 ### [#](https://community.optimism.io/docs/developers/bedrock/node-operator-guide/#system-requirements)System Requirements